Archery is the sport of accuracy, without that, it is of no use. You would not be able to reach your optimal results if you are an archer with an improperly tuned bow. Now, if you are more into the traditional bows, you might be asking yourself how to tune a recurve bow?
The task surely is tricky. However, you’re the one with craftsman skills, all you need is the right information.
Therefore, we have compiled all the steps you need to be aware of to achieve your most efficient results with bow shooting.
Table of Contents
Recurve Bow Tuning Guide
Below we have put together the step-by-step process of tuning a recurve bow.
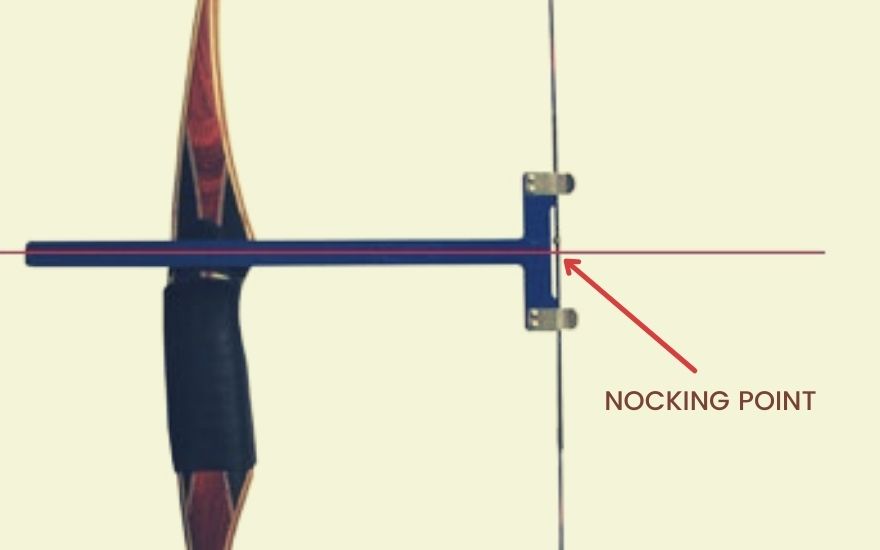
Step 1: Finding the Precise Location of the Nocking Point
One of the first things to ensure proper tuning of your bow and arrow is finding out the nocking point. It refers to the pre-decided point or spot where you will be shooting arrows from one after another.
These points can be compressed with the aid of brass units which are used for this very purpose or can just be tied onto the string.
A measuring tool called a ‘bow square’ or T-square- must be used to determine the bow’s nocking point. Lay the square flat on the arrow rest of the bow, check to find out the spot where the square and the string of your bow meets.
Now, secure the bow’s nock point no more than half inches upward the point which you found previously. This point is the spot where the T-square and Bowstring intersects.
However, to ensure precision, you must be gentle. Do not over-crimp or tighten the nocking points. Do it to the exact accuracy needed to keep the square stable at the spot.

Step 2: Micro-Tuning the Bow’s Brace Height
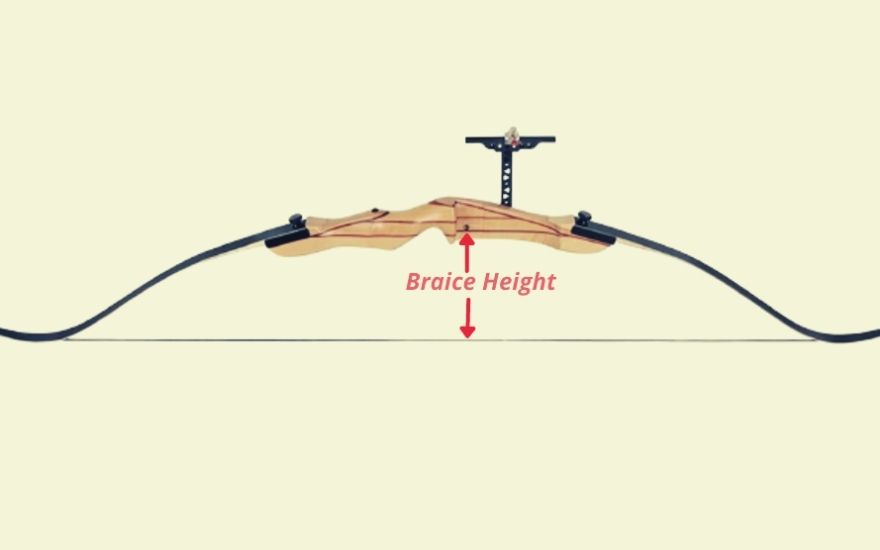
Brace height refers to the gap or distance that is present between the riser section and the bowstring when the tool is not in motion. Brace height is an important aspect of a bow since it deals with both noise levels and the accuracy of a recurve bow.
Therefore, the second thing you would want to do to tune a recurve bow is tuned its brace height. This is done by making adjustments to the twists of the recurve bow to make tall or short dimensions. The tension creates or reduced is then determined by how close or far apart they are when used.
More bow strings indicate higher brace height. And so, removing twists shortens the brace height.
Do note that this is a complex task and requires patience, people are likely to make lots of errors when tuning brace height. Short brace height can make the fletching touch the bow shelf while longer ones will make the shooting slow and weak.
Thus, make sure to find your sweet spot with dedication!

Helpful Guide: Recurve Bow Brace Height Chart and Its Adjustment Steps
Step 3: Centering the Arrows
To center your bows, you should be first familiar with an archer’s paradox. The flexing of the arrow that it leaves around the riser while it also flexes towards the aim is known as an archer’s paradox.
Compensation towards this paradox is required for tuning the bow. Therefore, you will have to adjust the tip of the arrow by calibrating the arrow rest plunger outwards toward the point of the bowstring.
The perfect offset numbers to keep in mind while making adjustments in this process are 1/16 inches to at least 1/8 inches.
Step 4: Paper Testing the Bow
This process is the best way to verify and make sure the way you determine points in the previous steps are correct and good to go.
To proceed, you must find a big paper sheet with a frame that holds in as per the height of your shoulder. If you want to put a barrier behind the sheet, make sure it is at least 4ft away so that the arrow has enough space to pass through.
Then go ahead and stand 6ft away from the sheet and shoot at least 3 arrows. You are going to be looking for the perfect hole an arrow leaves on the sheet of paper, if the hole looks otherwise, more adjustments are necessary.
Step 5: Testing of Accuracy and Tuning of Bare Shaft
This is simple, you just have to keep making several shots at a set target with fletched arrows to determine how it is working out.
You must make sure to keep the aiming point the same and then repeat the process with un-fletched and open arrows.
Analyze the changes in the impact of each group of arrows and then let that determine what more adjustments are needed.
Bare Shaft Tuning also includes factors of Porpoising (dolphin-like movement of arrows in flight) arrows and Fishtailing (fishtail-like movement of the back of the arrow in flight). These scenarios must be taken into account as well when tuning a bow.
Step 6: Proper Clearing
Proper clearance is an essential factor to consider when tuning an arrow and making it ready for shooting. Clearance indicates the way an arrow leaves the string without making any impact, touch or contact with the riser and rest of the bow.
However, you can select agents like powder or flour to track any unwanted contacts that the arrow makes. Apply the powder at primary points of the bow areas like the arrow rest, other sections that are three inches around the fletching. Apply powder on the fletching as well.
Lastly, shoot the arrows and check for any traces of tracking in the powdered spots. If there are no tracks, you are good to go, in case there is, re-adjust the elements of the arrow and the rest and keep repeating the process until desired results are achieved.
Final Thoughts
This brief yet informative article will surely help you if you have been wanting to learn how to tune a recurve bow. We hope we were able to assist you right, thanks for being with us!
Links of Related Posts You May Read:

