The art of archery has been in human society since the beginning of time. The earliest bows obviously had no trigger mechanism, but recurve bows are easier to set up and use in modern times. A recurve bow is a type of bow shaped like an 'S.' It is made from many pieces of wood assembled, including a center section called the riser, two limbs, and a string.
Now, if you are in archery, learning how to set up a recurve bow is essential but can be tricky at first.
Here's a step-by-step guide that will help you get started.
Table of Contents
7 Easy Steps To Set up A Recurve Bow
Below you go with an outline step-by-step. It is a natural order to go by that will include, but not be limited to: tips for setting up the perfect stance, attaching the sights for proper balance and torque, attaching bowstring, and much more.
Step 1: Assembling the Bow Parts
Yes, the first part of starting up recurve bow is putting the different pieces together.
The basic recurve bow parts are archer's grip, Limb, Riser, Bowstring, Arrow rest, Pins and Nocking point. Now, you will simply screw these parts together to make a new bow. It is not more than just attaching the limbs into their respective slots onto the riser. So, this part certainly is going to be a time-consuming task, but a rush will not do.
You can read the manual of your bow where instruction are given on how to put the parts together. That will help you understand how the bow works and what it consists of before doing anything.
So, the first thing you will want to learn is how to assemble a recurve bow.

Step 2: Attach the Bowstring
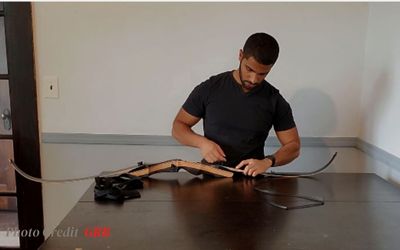
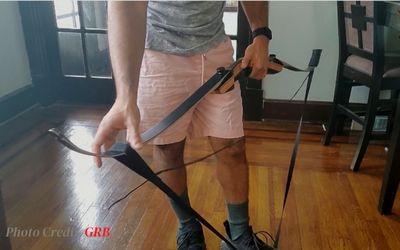
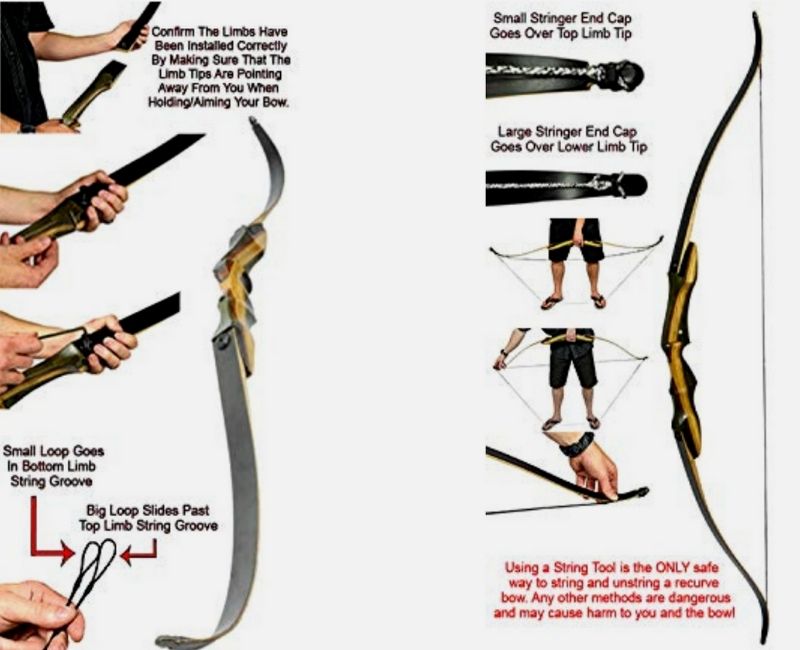
After assembling the bow parts, the task is attaching the bowstring and is a crucial phase to set up process.
Every archer knows that a bowstring can be a dangerous weapon if not correctly handled. Remember to put the bowstring on the bow before you do anything else! Arrows could become jammed in the wrong direction and never know it until the shooting.
So, the bowstring must be attached securely to the nocking point on the top of the bow, as well as through a loop or nock at the end of each arrow. Here, a bow stringer will be a great help to make the task easier and fun.
Not to slip by, bowstrings are often the weakest points of a child's bow, so teaching them how to do it themselves is an excellent way to learn about safety and skillful use of the tool.

Step 3: Attach the Sight
With the bowstring strung efficiently, the third step is attaching the bow sights. Three options can go on the sight, an L-shaped bracket, a bracket with a vertical bar, or just a horizontal bar. The choice largely depends on personal preference.
With different sights and attachment methods, getting the perfect shot can be a daunting task. Follow these three steps to attach your sights to your bow:
Place one end of the strap on the sight and wrap it around the top limb of the bow.
Bring the other end of the strap through any one hole in either side of the sight from back to front.
Now adjust the telescopic frame of the sight that is to relieve your eyes from strain.
Step 4: Set the Arrow Rest
To assemble a bow, you will need an "arrow rest," which is usually at one end of the bow and will prove to be an inevitable parts
A metal or plastic ring at the end of an arrow is called an arrow rest, and it is used to stabilize the arrow as it sits on the ground during shooting.
To attach the arrow rest, you will need a screwdriver, and you just need to unscrew the screw at the top of the rest and then place the screws through the holes you drilled into your bow. You just need to tighten them, then clamp both into place with vise grips.
When attaching, the broader portion of the arrow rest should be on the bottom and the top of the arrow rest should be placed against the inside of your handgrip, keeping your fingers from blocking your shot. The tip of the arrow rest should be lined up with where you want your arrow to go.
Step 5: Adjust the Brace Height
Adjusting the brace height on a recurve bow can make or break your shot. It's important because the wrong brace height can cause injury to your arm, shoulder, back, or neck.
The first step to finding the right brace height is to find out what size your bow is.
When beginning to set up a new recurve bow, no matter the length of the bow, it is necessary to make sure all of the hardware is tightened.
A common mistake when installing new hardware is that some screws are not tightened enough and then begin to vibrate during shooting. The brace height should be adjusted to help stabilize the arrow. Archers will have difficulty steadying their shots if the brace height is too low.
The brace height should be adjusted to fit the archer's arm length, hand size and style of shooting. This ensures comfort while drawing, aiming and releasing the bowstring. It also allows for better balance by adjusting for different frames of reference.
Step 6: Find out the knocking point
The knocking point varies depending on the instrument, but in the case of a recurve bow, knocking point is about halfway down the bow.
Recurve bows are typically shot with less force than crossbows, and the arrow is on the string when the bow is drawn. A recurve bow often has a more difficult draw, but such bows shoot more accurately and with less recoil.
Unlike a longbow, recurve bows use strong, flexible limbs that can bend to impart tension on the bow's belly and make it possible to store more energy in a shorter period.
So, The knocking point is crucial to shoot accurately. The knocking point is where two limbs of the bow meet. It dictates how far the arrow travels when it's released.
Step 7: Installing the Arrow Quiver
Finally, the bow quiver is installed at the end of the whole process. This eliminates any excess weight that may pull your arm back, causing you to lose accuracy.
However, the quiver should be no more than 15 inches from the grip handle. To install the quiver, right-handed bow users should start with their left hand, and left-handed shooters should begin with their right hand.
The arrow quiver is an often overlooked but ultimately crucial piece of equipment when it comes to bowhunting. Properly installing the quiver in the correct location on the bow will ensure that arrows can be drawn and replaced easily and efficiently.
The arrow resting on the arrow shelf slides into the quiver as it is pulled back to the anchor point. The archer slowly releases their fingers from the string, allowing one last look at the target before adjusting.
They adjust their elbow slightly so they are perfectly centered over the arrow shelf, pulling back to where they know they want it to be. Want to get in-depth guide to attach a quiver on your recurve bow? Read This Article.

The End
The steps discussed above to properly set up a recurve bow should help you accomplish the task with ease and fun. Indeed, a recurve bow is a great way to pass the time when not hunting as it is not merely an excellent pastime when hunting but also great fun with friends and family in your backyard or at a nearby archery range.
Setting your own recurve bow is no easy task, whether you're a hunter, archer, or just an avid outdoorsman. But this in-depth guide can help you do the job without hassle.
Links of Related How-Tos:

